Ducoup Marketplace Product Types Available to Sellers

![]()
To view the two drop down boxes above you’ll need to perform some configuration steps first. In your Woocommerce admin area create a new product, then set the Product data drop down to be “Variable product”

Now, before we do anything else, we’ll take a moment to consider categories and attributes on a Woocommerce site.
Categories and Attributes on a Woocommerce site
On a normal WordPress blog, we would divide our posts up into categories that would allow people to drill down into specific areas of our site. For example on this site, we have a number of Woocommerce articles and a few articles about c#, if a reader wanted to see all the Woocommerce articles then they could go to the Woocommerce category page () and have a good read of the articles there.
On a Woocommerce site, you also have categories, so you could, for instance, have a “t-shirt” category and then if a customer came to your store looking for t-shirts they could immediately look at all the t-shirts you have for sale.
In addition to categories, Woocommerce also adds an additional way of classifying products named “attributes”, you would normally use attributes to classify products in a way that went across category boundaries. So, if you were running a clothing store you might introduce a “color” attribute and that would allow you to group all types of clothing under the same attribute. This would then allow your customers to see all the items in your store that were red, so if they came to buy a red t-shirt, they could also get themselves a pair of red socks and sandals at the same time.
Categories and Attributes and Variable Products
The reason why we went on that brief tour of attributes and categories is that they are instrumental in setting up variable products.
When we set up a variable product we need to decide what variations of the product there will be. In the example we used at the start of this article we talked about Napkins that you could buy in different colors with different color napkin rings, so let’s have a look at how we could go about setting that up as a variable product.
If we go to the “Attributes” tab of our newly created variable product then we should see something similar to the screenshot below
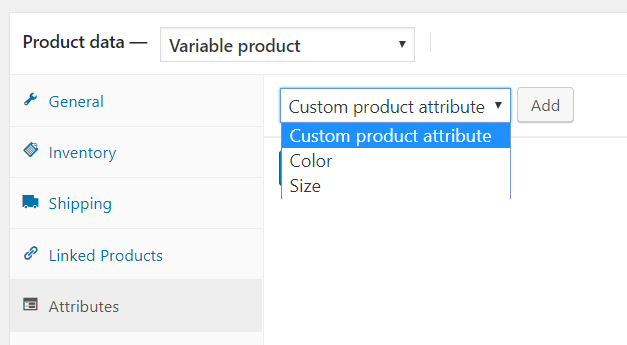
In the store I’m using for this example I already have two attributes, one named “Color” and one named “Size”, so we can see those two attributes in the drop-down. If I select “Color” and then click “Add” I see the following –
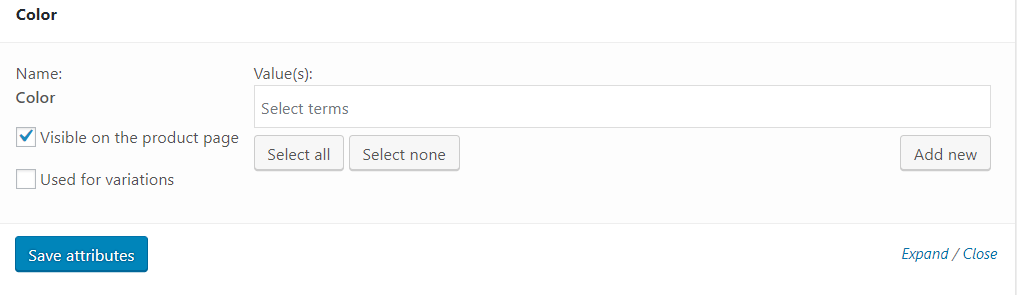
Now we can see two checkboxes if only the “Visible on the product page” checkbox is checked then the attributes will be listed on the product information page and it will be possible to filter/search for the product using the “Color” attribute. You can find more details about this in our article that’s dedicated to explaining how attributes work.
If the “Used for variations” checkbox is checked then WooCommerce will make it possible to create variation products for all of the variable permutations created by the attributes, we’ll look at how to do this shortly.
So, having set-up the variable products for the colors we now need to set up the variable products for the napkin rings.
For the colors we used a global attribute as there was already one defined that suited our use case. For the napkin ring attribute, there is little point creating a global attribute as napkin ring color is an attribute that will only apply to napkins.
WooCommerce allows us to create an attribute that is specific to a product by choosing the “Custom product attribute” option

Once this option has been chosen you’ll be presented with the following fields

You can see how we’ve filled in the fields to reflect what we need from napkin ring attribute, note how we’ve entered the value “Red | Blue | Yellow” for the value field, this is because, for custom attributes, WooCommerce requires a pipe-delimited list of the possible values.
If we now save this custom attribute, as we have checked the “Used for variations checkbox” then WooCommerce will make it possible to create variations based on the attribute’s values, we’ll look at how to do this in the next section.
How to create the variable products
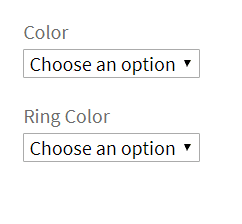
At this point, if we visit the product page we will see the following
This is because we have not yet created any variations, let’s do that now.
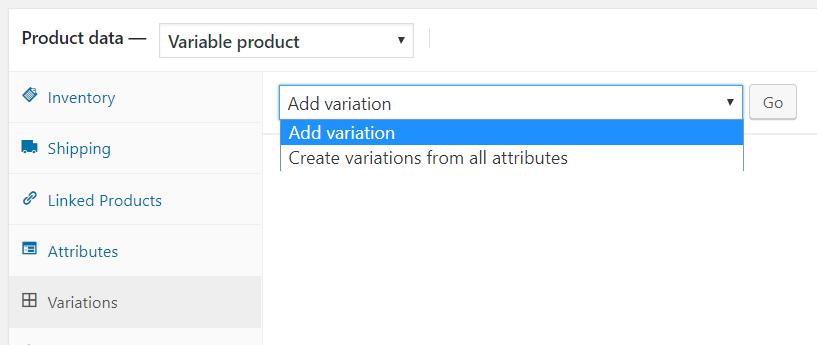
If we go back to the product’s admin screen and choose the “Variations” tab on Product data box then we’ll see a drop-down that gives us two options “Add Variation” and “Create variations from all attributes”
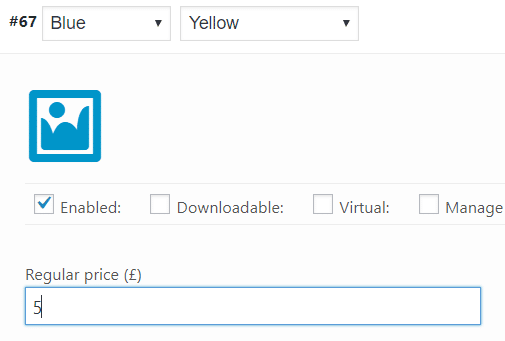
If we choose “Add Variation” and then click the downward facing arrow then we’ll see the following screen

If we set a price for the variation and click save, because we have chosen the “Any Color” and “Any Ring Color” options then WooCommerce will allow users to buy any of the napkin/napkin ring combinations (a yellow napkin with a red napkin ring, a yellow napkin with a blue napkin ring, a yellow napkin with a yellow napkin ring, a red napkin with a red napkin ring, etc.) and charge them the price we have specified.
But what if we want to make the variations different? Let’s say we want to charge more for a particular napkin/napkin ring combination.
In order to do this, we should select “add variation” again then choose the color and napkin ring color we want to charge more for in the drop downs. We can then set the price as before, but because we are now working with a specific variation then the price will only be applied to that variation.
We can see that the price change has been applied correctly by going to the product page and choosing the attributes that we have set the different price against, once we’ve done that, the correct price should be shown.
As well as the price we can also set other fields for each specific variation. For instance, we might want to set a different image for each variation or provide a specific description for each variation. If we ant to do something like this adding each variation one by one will be a time-consuming process. Luckily WooCommerce provides us with an option to create a variation for each of the attribute combinations for a particular product.
Choosing this option still gives the user the same number of variations to choose from as when we only created a single variation by choosing the “Any Color” and “Any Ring Color” options but when we choose the “create variations from all attributes option” we are able to set the properties against each of our variations rather than sharing properties between all of the variations.
Once both the “Color” and “Ring Color” attributes have been saved against the product then when we hit the product page for the napkins the user will be able to specify the napkin variation that they want to buy and add them to their basket.